jedyne do czego mogę mieć zastrzeżenie to jakość zdjęć zawartych w przesłanej instrukcji serwisowej ponieważ są fatalnej jakości, praktycznie nieczytelne. tak poza tym jestem zadowolony to jest to czego szukałem.
Instrukcja bardzo czytelna. zawiera co potrzeba. Polecam
Tekstowy podgląd strony 25 (kliknij aby zobaczyć)
HTV-A1
Diagnosis Method for the AFPS Assy
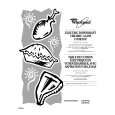
(1) Remove the three screws A fixing the Heat sink. (2) Remove the three PCB Holders and then remove the Heat sink. (Refer to Fig.1) (3) Remove the screw B, remove the two screws C, remove the two push rivets D, and then remove the AFPS assy. (Refer to Fig. 3) (4) Short-circuit KN101 of the AFPS assy and KN1001 of the JACK assy. (5) Short-circuit all test terminals of the AFPS assy (SPRY, ACRY, PWON) to GNDD. (6) Remove C6031, enter an audio signal to the AL4 (Lch in) terminal, and analyze the AFPS assy. (Refer to Fig. 4)
Push Rivet D Screw C
JACK Assy
Screw B
Push Rivet D
AFPS Assy
Fig. 3
KN1001 Short-circuit SPRY, ACRY and PWON terminals to GNDD. Remove C6031 JACK Assy